Feature Flag Driven Development in Machine Learning
Table of Contents
- Overview
- How Search Works?
- Semantic Search vs Keyword Search
- How Semantic Search Works?
- Semantic Search Implementation
- Feature Flags to the Rescue
- References
Overview
In my prior role I was working on building out our companies search engine where users could search across our entire product suite and hopefully showcase answers/products that are relevant to the users search query. This system was interesting in the sense that it combined regular search that you would experience with using Google Search + GenAI, much like how Google Search works right now:
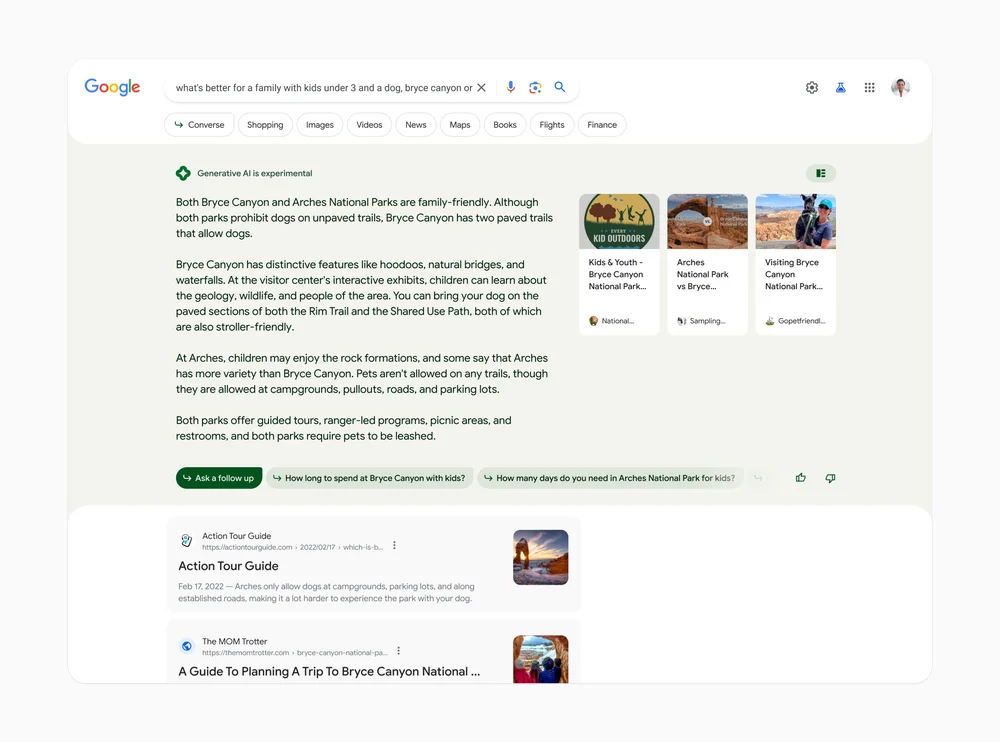
Breaking this down we can split the main important parts of building out the entire search experience for users into:
- Query - The user’s query
- GenAI Search Results - Output from the GenAI Search Service results, powered by an LLM
- “Regular” Search Results - Output from the Regular Search Results
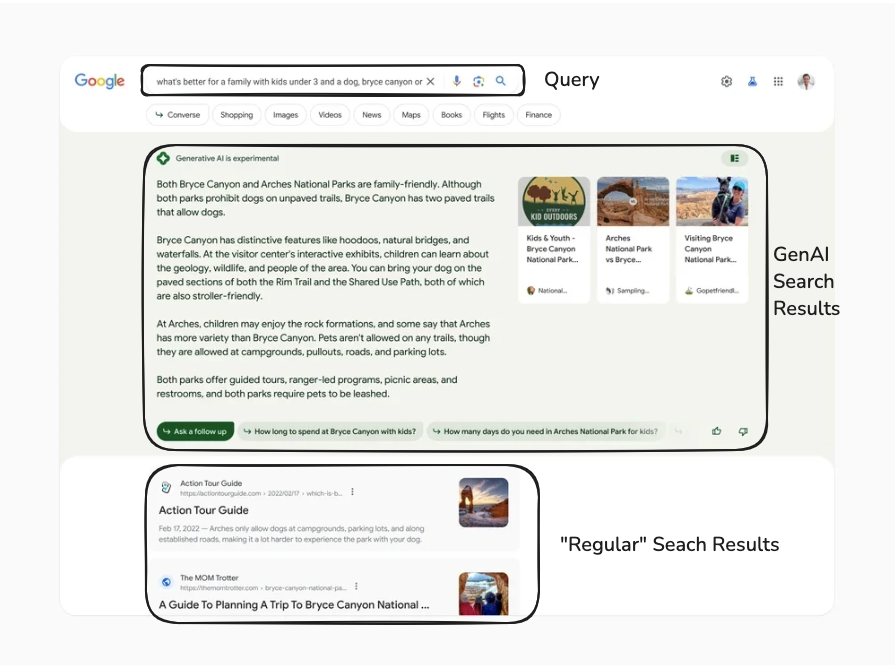
In terms of a graph, we can see that the Query is sent to the Frontend which then sends concurrent requests to both Search services:
I won’t be diving into the GenAI Search Service details in this post. Instead, I’ll focus how I tried to improve our “Regular” Search Service while navigating several key constraints:
- Time - Like most startups, features needed to ship “yesterday”
- System Reliability - The search revamp was mission-critical. Poor results could drive users away from adopting the new system entirely.
- Complex Integration Requirements - Beyond standard search complexity, we needed to integrate machine learning models to improve result relevance.
If you aren’t interested in going into the details about Semantic Search and want to dive into how feature flags can be used to speed up your development work then head on over here.
How Search Works?
The next section is a condensed version of this amazing blog post from Eugene Yan.
 Search Engines are very complex pieces of software which can be condensed down into the following two stages:
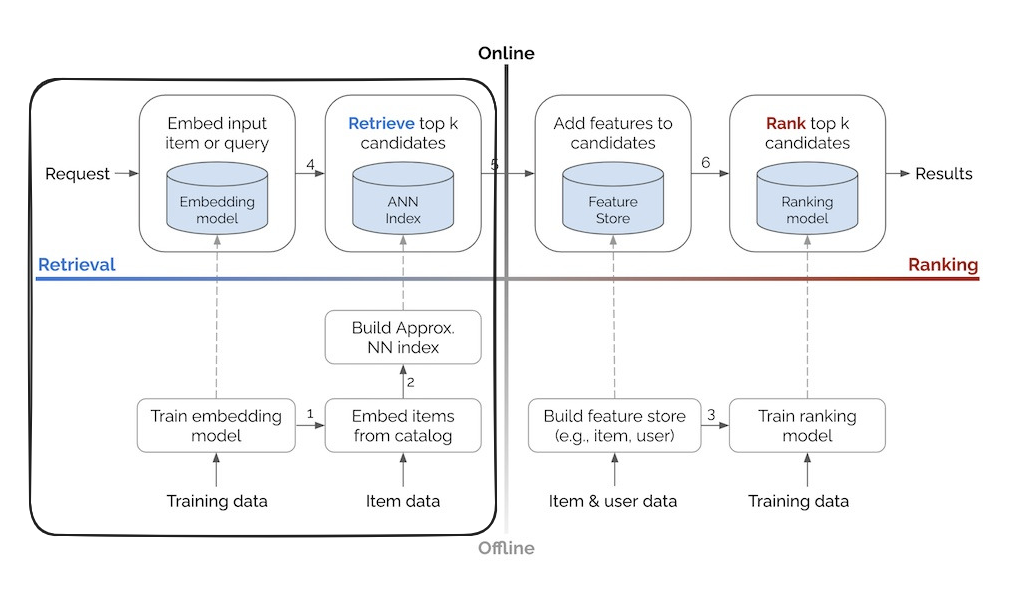
- Retrieval - Fetching a representative sample of the items to search through. For example, social media platforms such as TikTok and Instagram would pull shot-form video’s. I say a representative sample as, in most cases in Search and Recommendations its impossible to perform a greedy search across all possible items when the # of items to search through is in the billions/trillions. Retrieval is focused on being fast and doing a good enough job considering the fact that the items to search through is massive, i.e., 1M -> 100 items. You could just show the results here but they wouldn’t be that relevant as we would like due to the fact that we are not encoding any additional features that could improve search results.
- Ranking - Of the representative sample that was returned lets turn them into a better set of ranked items incorporating user/item/contextual features that could help give them a more optimal ordering. This step is much slower than the retrieval stage. In each of the two stages we need to perform actions in both offline and online settings:
- Offline - Ahead of time before the results are even shown. For example, we could be ingesting documents to search over into our search database.
- Online - When a user’s query is to be answered we will need to perform these steps in order to generate a response. For example, we would need to retrieve the items we want and then pass them over to the ranking stage which reranks them and then finally return the results.
One thing to note about the prior diagram is that this is a very Machine Learning centric search system, where we utilise Machine Learning models for the ranking stage or using embedding models to convert natural language text into numerical representations that a computer can understand while encoding intricacies related to languages. This kind of systems are setup after much iterations on basic keyword search such as inverted indexes, tf-idf, bm25 and so on. The main points in the 2x2 matrix still apply here.
Since we were in the early stages of improving search relevance the initial implementation used OpenSearch running on the AWS’s Managed OpenSearch offering with BM25 ranking, which worked reasonably well for exact matches.
We supplemented the use of it with custom re-rankers that would apply heuristics in order to further re-rank items incorporating business requirements where we could add in our own sort of boosting logic where the business sees fit. For example, in the context of an e-commerce store you might want to add in custom boosting logic:
{
 "query": {
   "function_score": {
     "query": {
       "multi_match": {
         "query": "running shoes",
         "fields": ["title", "description", "brand"]
       }
     },
     "functions": [
       {
         "exp": {
           "created_date": {
             "origin": "now",
             "scale": "30d",
             "decay": 0.5
           }
         },
         "weight": 2
       },
       {
         "filter": {
           "range": {"inventory_count": {"gt": 5}}
         },
         "weight": 1.5
       },
       {
         "field_value_factor": {
           "field": "rating",
           "factor": 1.2
         }
       }
     ],
     "score_mode": "sum",
     "boost_mode": "multiply"
   }
 }
}
The prior query would:
- boost new arrivals
- prioritize in-stock items
- factor in product rating
- etc.
In the Machine Learning space, you would learn these sorts of interactions instead via training a Learning to Rank(LTR) model using features related to click-through rates, conversion rates, etc.
Semantic Search vs Keyword Search
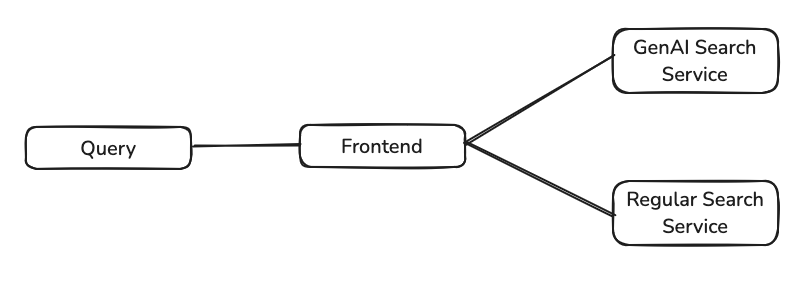
The issue with Keyword Search and BM25(builds off TF-IDF) is that user queries aren’t as black and white as finding the most relevant document looking into:
- how frequently a term appears in a document(TF)
- how unique that term is across all documents(IDF)
Keyword search fails to understand the context and meaning behind queries. A search for “affordable running shoes” might miss relevant results for “budget athletic footwear” despite their semantic similarity. This is where embeddings come in - they represent words and phrases as dense vectors in high-dimensional space, capturing semantic relationships and contextual nuances. By encoding meaning rather than just matching exact terms, embeddings enable search systems to understand that “cozy apartment” and “comfortable flat” are conceptually similar, even without shared keywords.

How Semantic Search Works?
Semantic Search requires the following:
- Word Embeddings
- Vector Database
Word Embeddings
Embeddings which are the core building block of any NLP model was first highlighted via the seminal paper Word2Vec. The key breakthrough was showing that words with similar meanings would cluster together in vector space, enabling mathematical operations on language (like “king - man + woman = queen”). This distributional hypothesis - that words appearing in similar contexts have similar meanings - provided a foundation for modern NLP.

Vector Databases
A vector database indexes and stores vector embeddings for fast retrieval and similarity search, with capabilities like CRUD operations, metadata filtering, horizontal scaling, and serverless.
 There are a ton of vector database options out there, largely split into purpose built vector databases and databases with vector extensions added to them.

Picking a vector database to use warrants its own blog post due to the sheer number of options and considerations that need to take place.
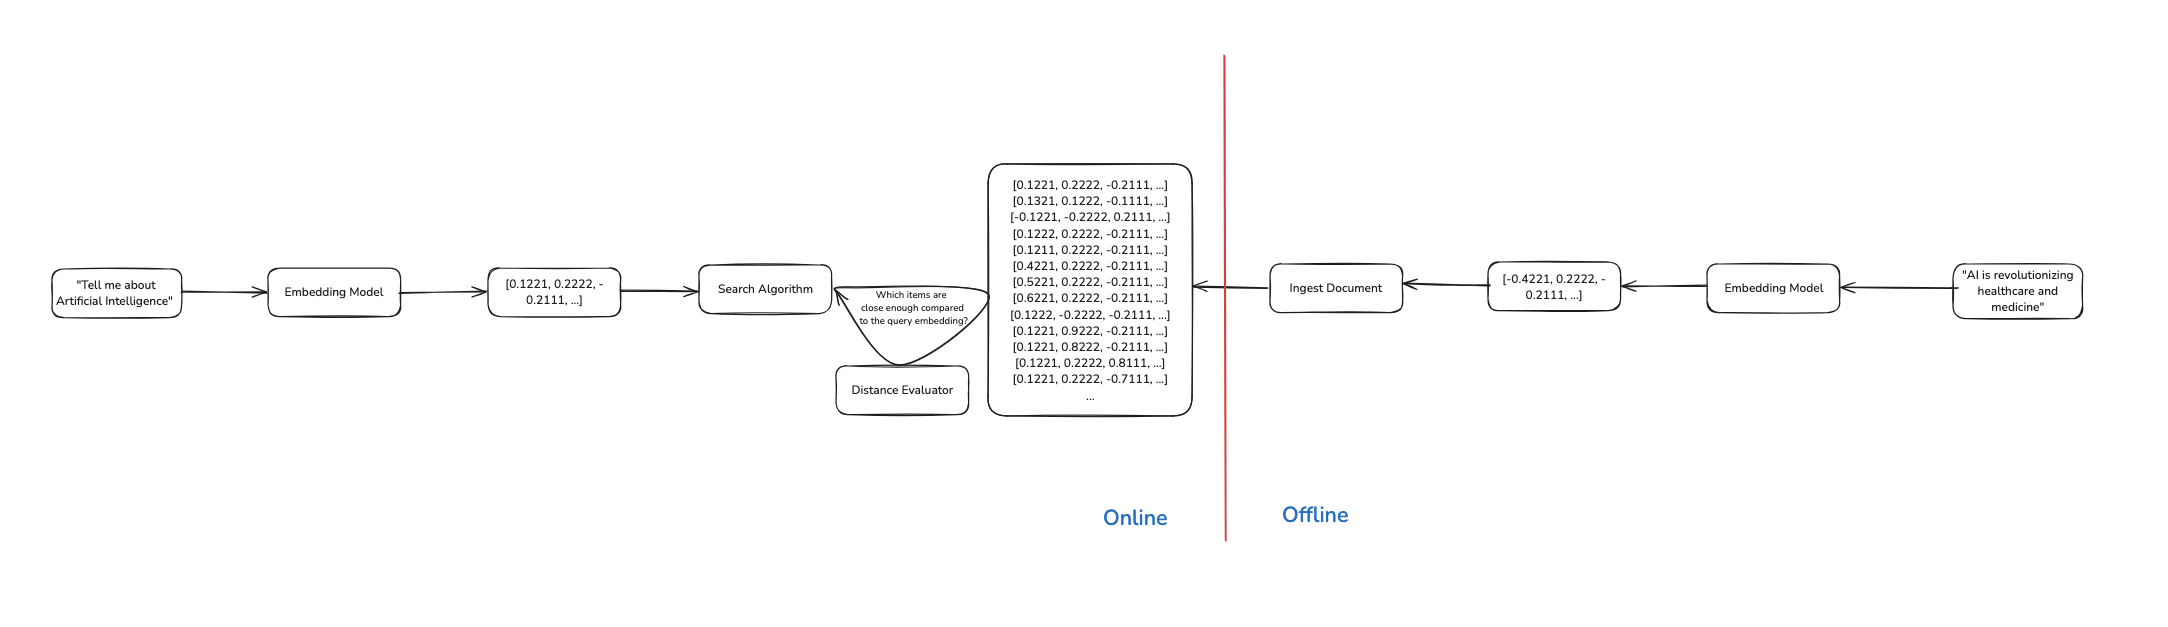
Going back to Eugene’s terrific blog post we can see how a Semantic Search fits into the big picture by looking at the Retrieval section covering the offline and online side of search.
Offline
A document comes in and is transformed from its format such as text/image into an embedding using an embedding model such as thenlper/gte-large. For example, lets say that we are trying perform semantic search over the review_body in the following document:
#### Phase 1: Generating an Embedding for the Document
{
  "review_id": "en_0802237",
  "product_id": "product_en_0417539",
  "reviewer_id": "reviewer_en_0649304",
  "stars": "3",
  "review_body": "I love this product so much i bought it twice! But their customer service is TERRIBLE. I received the second glassware broken and did not receive a response for one week and STILL have not heard from anyone to receive my refund. I received it on time, but am not happy at the moment.",
  "review_title": "Would recommend this product, but not the seller if something goes wrong.",
  "language": "en",
  "product_category": "kitchen"
}
After we run our embedding model on the field that we want to embed, we would get a new field in the document, review_body_embedding which will contain a vector of a fixed dimension with floats where the fixed dimension is dependent on the embedding model we use 1024.
NOTE: Embeddings will be truncated in the examples.
{
  "review_id": "en_0802237",
  "product_id": "product_en_0417539",
  "reviewer_id": "reviewer_en_0649304",
  "stars": "3",
  "review_body": "I love this product so much i bought it twice! But their customer service is TERRIBLE. I received the second glassware broken and did not receive a response for one week and STILL have not heard from anyone to receive my refund. I received it on time, but am not happy at the moment.",
  "review_body_embedding": [0.1234, -0.1122, 0.8889],
  "review_title": "Would recommend this product, but not the seller if something goes wrong.",
  "language": "en",
  "product_category": "kitchen"
}
Online
Phase 1: Generating an Embedding for the Query
When a user’s query comes in we will then convert that into an embedding using the exact same model that was used to embed the documents, this is a very important step.
{
  "query": "Find me reviews related to glassware"
}
After embedding the user’s query you will get the following input document:
{
  "query": "Find me reviews related to glassware",
  "query_embedding": [0.2212, 0.9221, -0.1111]
}
Phase 2: Searching over the Embeddings in the Database
Next is the fun part where we effectively search over the documents that we store within the database using k-NN to search through the data and use a similarity evaluator/distance function to give us an understanding of what is close to the document that we are searching for. Below is a sample implementation of it in plain Python using Cosine Similarity as the similarity evaluator
import numpy as np
from sklearn.metrics.pairwise import cosine_similarity
from sentence_transformers import SentenceTransformer

def knn_search(query: str, k: int = 2) -> list:
    """
    Perform k-NN search over a mock database using sentence embeddings

    Args:
        query (str): Search query text
        k (int): Number of nearest neighbors to return
        mock_data (dict): Optional mock database. If None, uses default example data

    Returns:
        list: Top k documents and their similarity scores as (doc_id, similarity, text) tuples
    """
    # Initialize the embedding model
    model = SentenceTransformer('all-MiniLM-L6-v2')

	mock_data = {
		'doc1': 'The quick brown fox jumps over the lazy dog',
		'doc2': 'Machine learning is a subset of artificial intelligence',
		'doc3': 'Python is a versatile programming language',
		'doc4': 'Neural networks are inspired by biological brains',
		'doc5': 'Data science involves statistics and programming'
	}

    # Compute query embedding
    query_embedding = model.encode(query)

    # Compute embeddings for all documents and calculate similarities
    similarities = []
    for doc_id, text in mock_data.items():
        doc_embedding = model.encode(text)
        similarity = cosine_similarity(
            query_embedding.reshape(1, -1),
            doc_embedding.reshape(1, -1)
        )[0][0]
        similarities.append((doc_id, similarity, text))

    # Sort by similarity and return top k
    similarities.sort(key=lambda x: x[1], reverse=True)
    return similarities[:k]
NOTE: When it comes to vector search you can do it two ways:
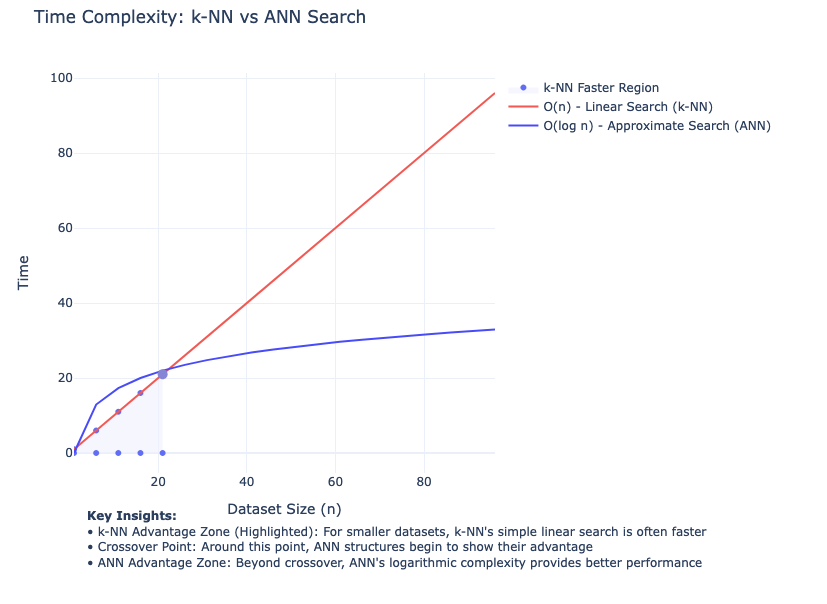
- Brute Force - using k-NN where you compare the query vector against every single vector in your database, calculating distances/similarities for each one. This is accurate but becomes slow with large datasets.
- Approximate - Uses specialised data structures and algorithms (like LSH, HNSW, or IVF) to create indices that enable better search times. While not 100% accurate, these methods trade a small accuracy loss for dramatically faster search speeds. Popular implementations include:
These approximate methods typically achieve 95-99% accuracy compared to brute force while being orders of magnitude faster, making them practical for large-scale applications.
Below is a chart highlighting the inflection point in terms of dataset size where it pays off to actually start using ANN over k-NN. Depending on your situation and product needs you might have to stick to just using k-NN if you require 100% accuracy in retrieved search results while taking the increase in latency.
Big Picture of Semantic Search
Taking a step back this is how the step-by-step of the offline and online flow looks like:
Pro Tip: Leverage OpenSearch Pipelines
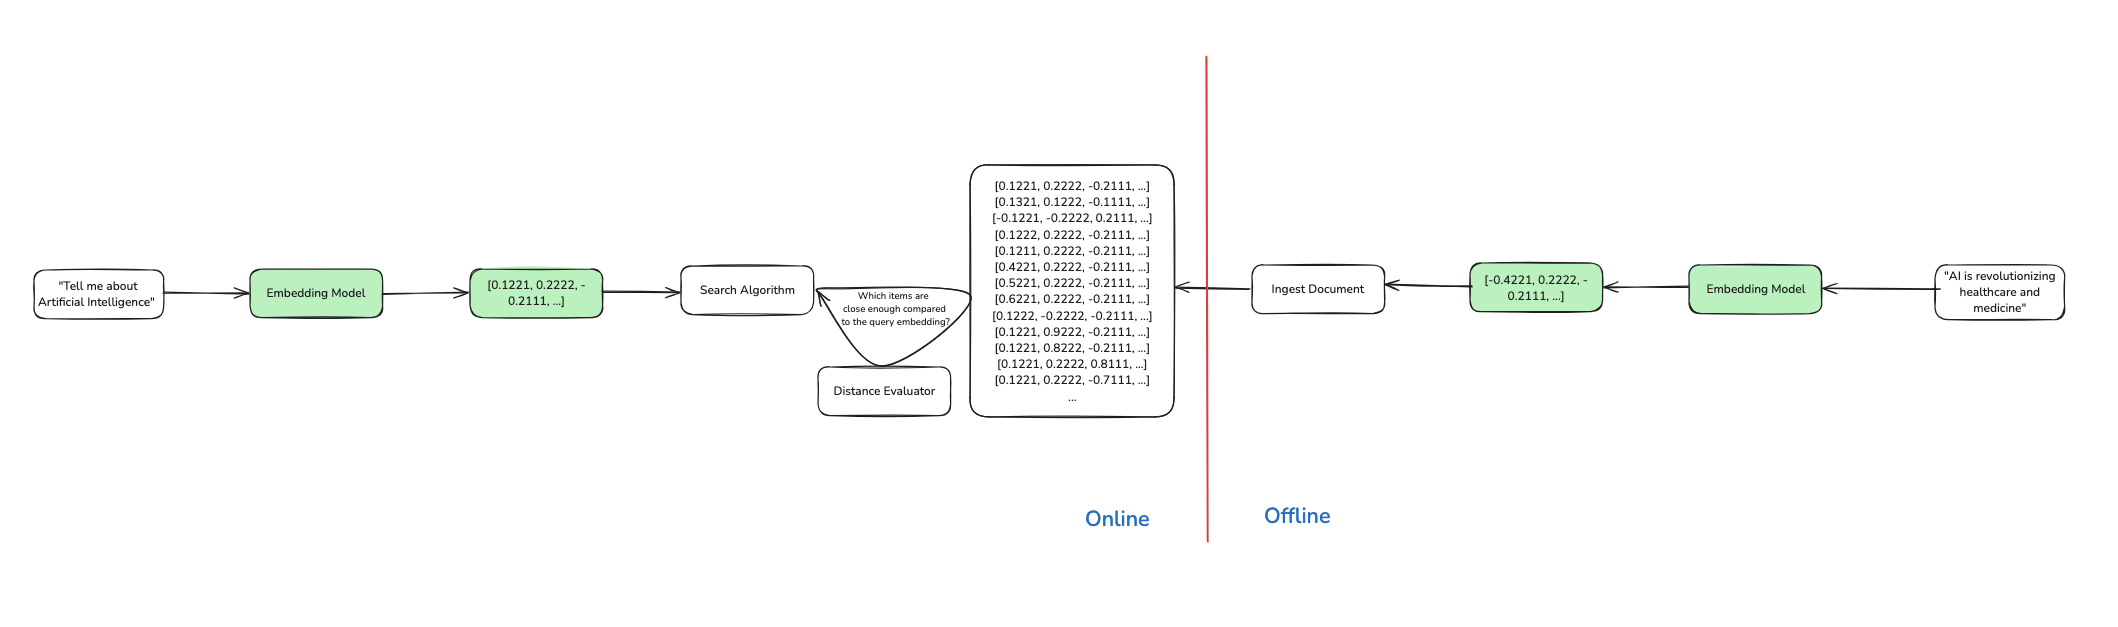
Trying to implement this is quite a challenge especially considering the fact that we have two different stages the online and offline stage. Its very easy to mess things up and introduce what is known as training-serving skew where there are differences between the offline and online section of Machine Learning systems. In this scenario we would have to ensure that the embedding model that we use for the offline and online system are exactly the same and more importantly use the exact same parameters such as the:
- maximum sequence length
- text processing parameters
- etc.
OpenSearch has this neat functionality where you can deploy Machine Learning Models within the same OpenSearch cluster and leverage ingest pipelines in order to setup a pipeline that can be used for converting documents during ingestion time(offline) and the query(online) into embeddings for you to process:
PUT /_ingest/pipeline/nlp-ingest-pipeline
{
  "description": "A text embedding pipeline",
  "processors": [
    {
      "text_embedding": {
        "model_id": "bQ1J8ooBpBj3wT4HVUsb", # MODEL_ID
        "field_map": {
          "passage_text": "passage_embedding"
        }
      }
    }
  ]
}
In the k-NN index you would then set the pipeline to use via the default-pipeline to use parameter:
PUT /my-nlp-index
{
  "settings": {
    "index.knn": true,
    "default_pipeline": "nlp-ingest-pipeline" # HERE
  },
  "mappings": {
    "properties": {
      "id": {
        "type": "text"
      },
      "passage_embedding": {
        "type": "knn_vector",
        "dimension": 768,
        "method": {
          "engine": "lucene",
          "space_type": "l2",
          "name": "hnsw",
          "parameters": {}
        }
      },
      "passage_text": {
        "type": "text"
      }
    }
  }
}
By leveraging OpenSearch pipelines we do not have to perform the steps that are highlighted in green, which simplifies the overall process.
Be warned this ease does come with some downsides:
- colocation of Machine Learning workflows with Search workflows on the same nodes, especially when using the managed offering for OpenSearch on AWS you do not have the ability to specify that the Machine Learning models deployed on the OpenSearch cluster are deployed on specific nodes just for Machine Learning models, this however can be done if you self-host OpenSearch and specify a node’s role via the ML Commons cluster settings.
- less flexibility in Machine Learning model deployment frameworks, as OpenSearch ML Commons uses Deep Java Libraryto deploy ML models I would prefer to use my current stack which has been battle-tested and supports Monitoring & Observability out-of-the box.
- limited support for custom remote ML model endpoints, this is true if you are using the Managed OpenSearch offering where although it might seem like it supports a lot of different options as per the docs, on the contrary it only works with publicly exposed API Endpoint due to the fact that a managed service on AWS is deployed within AWS’s own private account with VPC access from a customers AWS account to said AWS account but not the other way around due to the unidirectional nature of AWS PrivateLink.
Feature Flags to the Rescue!
Okay I have been rambling on about Semantic Search a lot and you must be wondering “Geez Yudhiesh get to your point already!”, now the biggest issue with all of this was that I had to do all of these steps into a codebase that I was:
- completely new to in terms of contributing
- it was in Java which I have not touched since university and never had much fun coding in
Plus I had to do it quick and with zero impact on the current search experience which was being A/B tested by Data Scientists that were monitoring key metrics such as Click-through Rate(CTR).
What are Feature Flags?
Now going back to our problem statement, a very simple thing to do would be to ensure that only I could interact with said feature. In doing so we would be able to solve said issues due to the fact that if I am the only person interacting with the feature:
- impact is centered around my own experience instead of end users.
- we can relaxen our requirements to push the feature out, perhaps we don’t have to push for 100% test coverage, etc. and instead can trial out the feature to prove it solves the problem in the first place prior to investing more time and effort into it
Our Search API would take in as the minimum the following payload:
{
  "query": "Food",
  "userId": 123456789
}
Now since we had a good culture of dog fooding, I already had my own account for our mobile app.
Side note, if you work at an organization and don’t even use the product offered, how can you even improve it in any way?
In my code based on this, I could do something like this where I expose the feature out to my userId exclusively
public class SearchService {
    private static final long MY_USER_ID = 123456789;

    public SearchResponse search(SearchRequest request) {
        if (request.getUserId() == MY_USER_ID) {
            return semanticSearch(request);
        }
        return standardSearch(request);
    }

    private SearchResponse semanticSearch(SearchRequest request) {
        // New semantic search implementation
        return SearchResponse.builder()
                .results(semanticSearchEngine.search(request.getQuery()))
                .build();
    }

    private SearchResponse standardSearch(SearchRequest request) {
        // Existing search implementation
        return SearchResponse.builder()
                .results(searchEngine.search(request.getQuery()))
                .build();
    }
}
In reality there was a separate service to translate a
user's id -> user's emailinstead of trying to manually figure this out.
Essentially what we have done here is setup a very basic feature flag for our application!
Feature flags are a software development concept that allow you to enable or disable a feature without modifying the source code or requiring a redeploy.
But how would we handle the following situations:
- adding in more user’s to the target pool to be shown semantic search results?
With the current implementation we would not adhere to the definition of a feature flag and instead would be require a redeployment of the application each time we had to alter the target users to expose this feature flag to.
Feature Flag Platforms
With the aforementioned limitation, a feature flag management platform comes in to solve the problem. These platforms allow you to wrap all your feature flags behind an API that you interact with and more importantly allow you to make changes to them quickly via a simple UI.
Here are some example platforms:

These platforms enable sophisticated flag management:
- Targeting Control
- Individual user targeting by ID, email, or custom attributes
- Bulk user targeting via CSV uploads
- Percentage-based rollouts
- Geographic targeting
- Device/platform specific releases
- Advanced Features
- Real-time flag updates without code deployments
- Detailed audit logs for flag changes
- A/B testing and experimentation tools
- Flag dependencies and prerequisites
- SDKs for multiple programming languages
Integrating Feature Flag Platforms into our ML System
This integration needed to happen in two phases.
Phase 1: Data Ingestion
First, we needed to ensure documents were being indexed into OpenSearch alongside our existing search engine. In our setup we had a Kafka topic that we listened to for new documents to be ingested which had to write new data to the OpenSearch index with the k-NN index setup. I also had to reindex the new k-NN index with data from the original index used for lexical search but this code has been excluded. This required:
@Service
@Slf4j
public class DocumentIngestionService {
    private final LaunchDarkly ldClient;
    private final OpenSearchClient openSearchClient;
    private static final String OPENSEARCH_INGESTION_FLAG = "enable-opensearch-ingestion";

    @KafkaListener(topics = "documents-topic")
    public void processDocument(ConsumerRecord<String, Document> record) {
        LDUser systemUser = new LDUser.Builder("system")
                .custom("environment", getEnvironment())
                .build();

        boolean enableOpenSearchIngestion = ldClient.boolVariation(
            OPENSEARCH_INGESTION_FLAG,
            systemUser,
            false
        );

        if (enableOpenSearchIngestion) {
            try {
                IndexRequest<Document> request = IndexRequest.of(r -> r
                    .index("documents")
                    .id(record.key())
                    .document(record.value())
                );
                openSearchClient.index(request);
                log.info("Document indexed in OpenSearch: {}", record.key());
            } catch (Exception e) {
                log.error("Failed to index document in OpenSearch: {}", record.key(), e);
            }
        }

        // Continue with existing processing
        processExistingSystem(record);
    }
}
Phase 2: Search Implementation
Only after confirming successful data ingestion did we enable the semantic search feature.
public class SearchService {
   private final LaunchDarkly ldClient;
   private static final String SEMANTIC_SEARCH_FLAG = "semantic-search-enabled";

   public SearchService(LaunchDarkly ldClient) {
       this.ldClient = ldClient;
   }

   public SearchResponse search(SearchRequest request) {
       LDUser user = new LDUser.Builder(String.valueOf(request.getUserId()))
               .build();

       boolean semanticSearchEnabled = ldClient.boolVariation(
           SEMANTIC_SEARCH_FLAG,
           user,
           false  // fallback value if flag evaluation fails
       );

       if (semanticSearchEnabled) {
           return semanticSearch(request);
       }
       return standardSearch(request);
   }

   private SearchResponse semanticSearch(SearchRequest request) {
       return SearchResponse.builder()
               .results(semanticSearchEngine.search(request.getQuery()))
               .build();
   }

   private SearchResponse standardSearch(SearchRequest request) {
       return SearchResponse.builder()
               .results(searchEngine.search(request.getQuery()))
               .build();
   }
}
Now with that I was able to safely and quickly deploy a very experimental feature out and test it in Production with zero impact to end users, isn’t that neat.